React CICD 구현
서버환경
서버 : linux ubuntu
백엔드 : spring boot + jwt + mybatis
프론트 : 리액트
Gitlab(도커)
Jenkins(도커)
NGINX
Jenkins
jenkins가 도커컨테이너 환경이라면
내부에 접속해서node를 설치해야함
# 컨테이너 접속 (root로)
docker exec -u root -it jenkins bash

# Debian/Ubuntu 기반(jenkins/jenkins:lts 기본)
apt-get update
apt-get install -y curl ca-certificates gnupg
curl -fsSL https://deb.nodesource.com/setup_18.x | bash -
apt-get install -y nodejs

# 확인
node -v && npm -v
exit
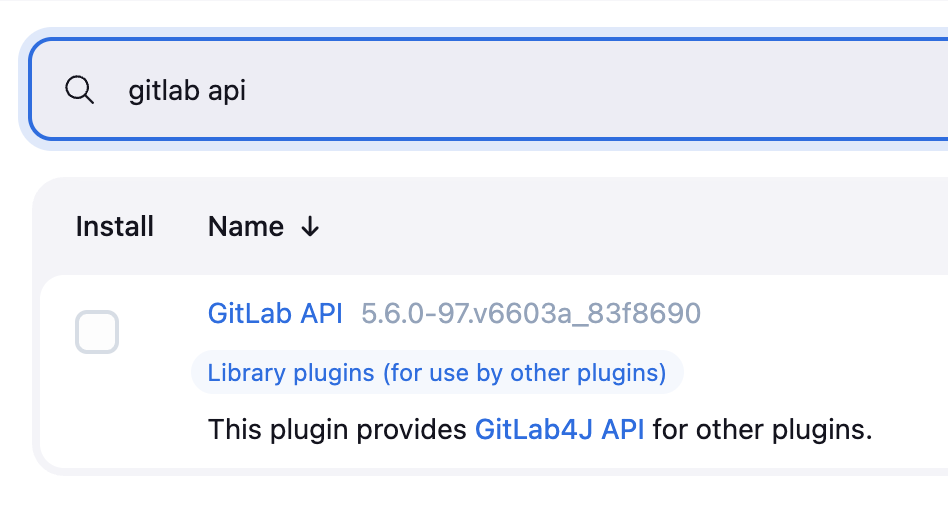
그리고 jenkins 플러그인에서 gitlab 설치되어잇어야함

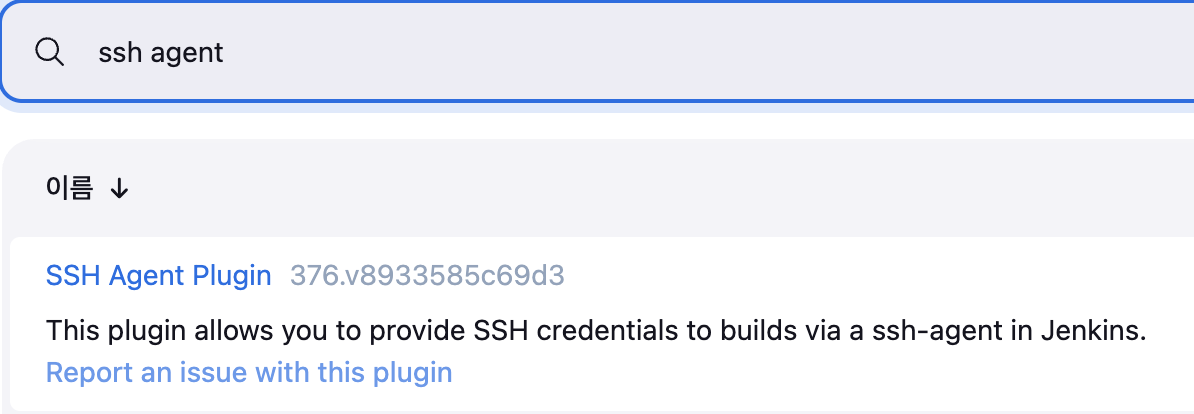
ssh 도 사용할거라
ssh agent도 설치

리눅스 서버에 키설정도되어있어야함
https://jwinjection.tistory.com/291
Ubuntu | SSH Key 접속 설정
SSH Key 접속 설정SSH를 비밀번호로 접속하게 되면미국, 멕시코, 중국쪽에서 거의 분단위로 brute force를 하기때문에 언젠간 해킹당할 위험이 있습니다.그래서 key를 통한 접속을 하면 안전합니다.
jwinjection.tistory.com
파이프라인
pipeline {
    agent any
    environment {
        LOCAL_REGISTRY = 'localhost:5000/원하는레지스트리이름'  // 프론트 전용 레지스트리
        SCRIPT_DIR = '프로젝트경로/deploy-script.sh'
        BASE_PATH = '프로젝트경로'
        USER_ID = '아이디'
        HOST_URL = '호스트URL' // http://생략
        SSH_PORT = 'SSH포트'
        GIT_URL = '프로젝트Git주소'
    }

    stages {
        stage('Git Clone') {
            steps {
                git branch: 'main', credentialsId: 'gitlab-account-token', url: "${GIT_URL}"
            }
            post {
                failure {
                    echo '❌ Repository clone failure!'
                }
                success {
                    echo '✅ Repository clone success!'
                }
            }
        }

        stage('Build React App') {
            steps {
                sh '''
                    export CI=false
                    npm install
                    GENERATE_SOURCEMAP=false npm run build
                '''
            }
        }

        stage('Build Docker Image') {
            steps {
                sh "docker build -t ${LOCAL_REGISTRY}:latest ."
            }
        }

        stage('Push Docker Image') {
            steps {
                sh "docker push ${LOCAL_REGISTRY}:latest"
            }
        }

        stage('Upload deploy.sh) {
            steps {
                script {
                    sshagent(credentials: ['ssh-credentials']) {
                        sh """
                            # 워크스페이스의 최신 파일 → 원격 서버 BASE_PATH 로 복사
                            scp -P ${SSH_PORT} -o StrictHostKeyChecking=no \\
                                deploy-script.sh \\
                                ${USER_ID}@${HOST_URL}:${BASE_PATH}/
                        """
                    }
                }
            }
            post {
                success { echo '✅ deploy.sh 업로드 완료' }
                failure { error  '❌ deploy.sh 업로드 실패' }
            }
        }


        stage('Deploy to Server') {
            steps {
                script {
                    sshagent(credentials: ['ssh-credentials']) {
                        sh """
                            ssh -p ${SSH_PORT} -o StrictHostKeyChecking=no ${USER_ID}@${HOST_URL} "\
                                chmod +x ${SCRIPT_DIR} && \
                                sudo -n ${SCRIPT_DIR}"
                        """
                    }
                }
            }
        }
        stage('Cleanup Old Docker Images') {
            steps {
                script {
                    sshagent(credentials: ['ssh-credentials']) {
                        sh """
                            ssh -p ${SSH_PORT} -o StrictHostKeyChecking=no ${USER_ID}@${HOST_URL} "\
                                docker image prune -a -f --filter 'until=24h' && \
                                docker container prune -f"
                        """
                    }
                }
            }
        }
    }
}
만약 sudo 에러시
https://jwinjection.tistory.com/449
Ubuntu | 특정사용자 sudo 비밀번호 요구 예외거는법
sudo 비밀번호 요구 예외걸기0. 현재 사용자에게 허용된 sudo 명령 목록확인sudo -l1. visudo 명령어 실행sudo visudo 2. 아래 명령어 추가yourid ALL=(ALL) NOPASSWD: /myproject/*/deploy-script.sh 예시3. 저장ctrl + o -> ente
jwinjection.tistory.com
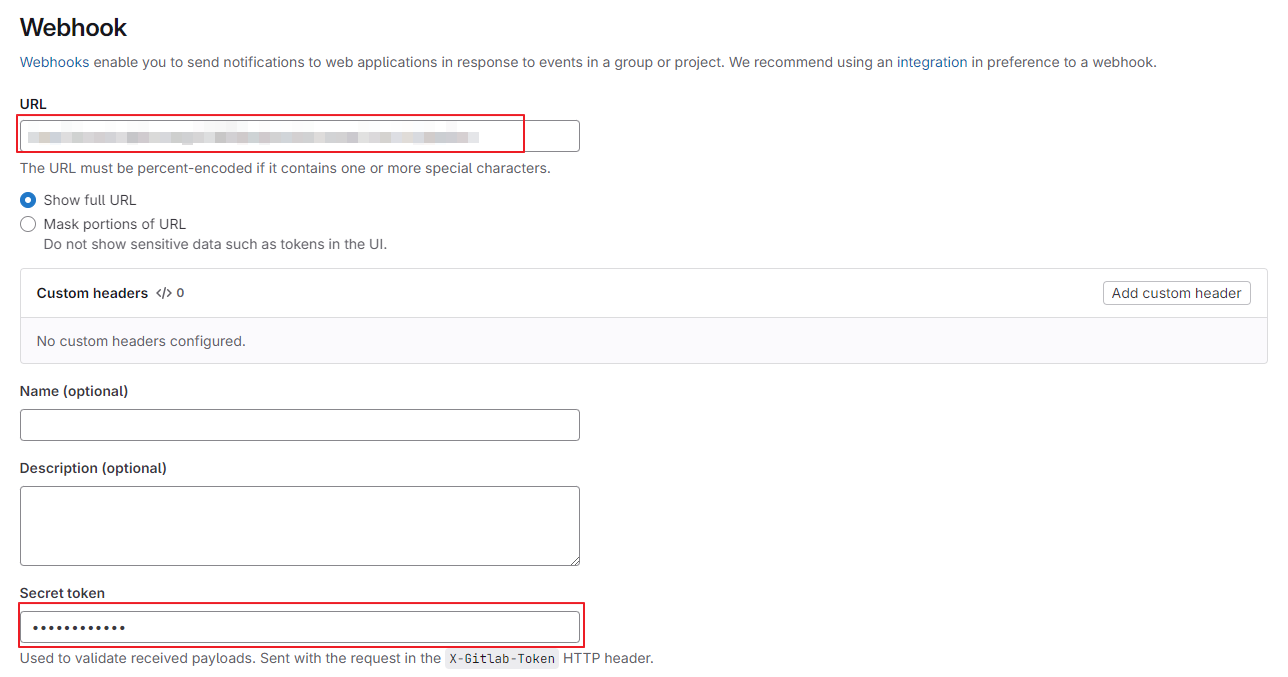
Triggers - webhook URL 복사

Triggers - 고급 - Secret token 생성

프로젝트 구조
내프로젝트
├── blue/              # Blue 환경용 빌드 디렉토리
│   ├── docker-compose.8083.yml
├── green/             # Green 환경용 빌드 디렉토리
│   ├── docker-compose.8084.yml
├── deploy-script.sh   # 배포 자동화 스크립트
├── Dockerfile         # 리액트 앱 도커 이미지 빌드용
├── npmStart.bat       # 로컬 테스트용 (Windows)
├── package.json       # 의존성과 스크립트 정의
├── public/            # 정적 파일
├── src/               # 리액트 소스 코드
mkdir blue green
docker-compose.8083.yml
version: "3.8"

services:
  react-app:
    container_name: myproject_front-blue
    image: localhost:5000/이미지명:latest
    restart: always
    ports:
      - "8083:80"
docker-compose.8084.yml
version: "3.8"

services:
  react-app:
    container_name: myproject_front-green
    image: localhost:5000/이미지명:latest
    restart: always
    ports:
      - "8084:80"
Dockerfile
# NGINX를 사용하여 정적 파일만 서빙
FROM nginx:stable-alpine

# 이미 Jenkins에서 빌드된 결과물이 현재 디렉토리에 있다고 가정
# 즉, Dockerfile과 같은 위치에 /build 폴더가 있음

COPY build /usr/share/nginx/html

# 필요 시 NGINX 설정 교체
# COPY nginx.conf /etc/nginx/conf.d/default.conf

EXPOSE 80
CMD ["nginx", "-g", "daemon off;"]
deploy-script.sh
#!/bin/bash

# === 설정 ===
APP_NAME="app이름_front"
BASE_PATH="/내프로젝트/프로젝트_front"
NGINX_INC_DIR="/etc/nginx/conf.d"

BLUE_PORT=8083
GREEN_PORT=8084

BLUE_COMPOSE="${BASE_PATH}/blue/docker-compose.${BLUE_PORT}.yml"
GREEN_COMPOSE="${BASE_PATH}/green/docker-compose.${GREEN_PORT}.yml"

# === 0. Docker 이미지 Pull ===
docker compose -p ${APP_NAME}-blue -f $BLUE_COMPOSE pull
docker compose -p ${APP_NAME}-green -f $GREEN_COMPOSE pull

# === 1. 현재 라우팅 확인 (심볼릭 링크 기준)
CURRENT_LINK=$(readlink "${NGINX_INC_DIR}/${APP_NAME}-url.inc")

if echo "$CURRENT_LINK" | grep -q "green"; then
    BEFORE_COLOR="green"
    AFTER_COLOR="blue"
    BEFORE_PORT=${GREEN_PORT}
    AFTER_PORT=${BLUE_PORT}
else
    BEFORE_COLOR="blue"
    AFTER_COLOR="green"
    BEFORE_PORT=${BLUE_PORT}
    AFTER_PORT=${GREEN_PORT}
fi

echo "🟢 ${APP_NAME} - ${AFTER_COLOR}(${AFTER_PORT}) 컨테이너 실행"
docker compose -p ${APP_NAME}-${AFTER_COLOR} -f ${BASE_PATH}/${AFTER_COLOR}/docker-compose.${AFTER_PORT}.yml up -d --force-recreate

echo "✅ ${AFTER_COLOR} 서버 실행 완료 (포트: ${AFTER_PORT})"

# === 2. Health Check ===
for cnt in `seq 1 10`; do
    echo "🔍 서버 응답 확인 중... (${cnt}/10)"
    STATUS=$(curl -s -o /dev/null -w "%{http_code}" http://127.0.0.1:${AFTER_PORT}/index.html)
    if [ "$STATUS" != "200" ]; then
        sleep 3
        continue
    else
        echo "🎉 Health Check 성공!"
        break
    fi
done

if [ $cnt -eq 10 ]; then
    echo "❌ Health check 실패. 배포 중단"
    exit 1
fi

# === 3. Nginx include 파일 전환 ===
INC_FILE="${NGINX_INC_DIR}/${APP_NAME}-url.inc"
NEW_INC="${NGINX_INC_DIR}/${APP_NAME}-url-${AFTER_COLOR}.inc"

echo "🔁 NGINX 라우팅 전환 → ${NEW_INC}"
ln -sf "$NEW_INC" "$INC_FILE"

# === 4. Nginx Reload ===
nginx -s reload

echo "🚀 ${APP_NAME} 블루그린 배포 완료: ${AFTER_COLOR} 서버로 전환"
Gitlab 웹훅 등록

jenkins에서 복사한 webhook url과 secret 토큰 붙여넣기

Trigger 설정
Push events - Wildcard pattern 체크에 main 으로 등록
Merge request events 체크

Nginx 설정
저는 nginx는 도커를 쓰지않고 바로 리눅스에 설치했습니다.
cd /etc/nginx
구조
nginx
├── conf.d
    ├── front-url-blue.inc
    ├── front-url-green.inc
    ├── front-url.inc      #심볼릭링크
    ├── backend-url-blue.inc
    ├── backend-url-green.inc
    ├── backend-url.inc    #심볼릭링크
├── sites-enabled
    ├── front.conf         #심볼릭링크
    ├── backend.conf       #심볼릭링크
├── sites-available
    ├── default
    ├── front.conf
    ├── backend.conf
conf.d
blue inc 파일생성
vi myapp_front-url-blue.incset $myapp_front http://127.0.0.1:8083;
green inc 파일생성
vi myapp_front-url-green.incset $myapp_front http://127.0.0.1:8084;
링크파일생성(초기설정 blue)
sudo ln -s /etc/nginx/conf.d/myapp_front-url-blue.inc /etc/nginx/conf.d/myapp_front-url.inc
백엔드도 동일한 형식으로 작성하면됩니다.
sites-enabled
sites-enabled에는 sites-available폴더내 default파일의 심볼링 링크가 있다. 이를 비활성화(제거)해야함
default 비활성화
sudo unlink /etc/nginx/sites-enabled/default
sites-available
프론트
vi myapp_front.confserver {
listen 8188;
server_name localhost;
# ✅ 정적 리소스는 React 서버로
location ~* ^/(static/|js/|css/|images/|fonts/|favicon\.ico|.*\.(js|css|png|jpg|jpeg|svg|woff2?|ttf|eot|ico|json|glb|gltf|wasm))$ {
include /etc/nginx/conf.d/sb_sewer_front-url.inc;
proxy_pass $myapp_front;
proxy_http_version 1.1;
proxy_set_header Host $host;
proxy_set_header X-Real-IP $remote_addr;
proxy_set_header X-Forwarded-For $proxy_add_x_forwarded_for;
proxy_set_header X-Forwarded-Proto $scheme;
}
# ✅ 로그인, 회원가입 등 인증 관련 요청 → 백엔드로
location /api/login {
include /etc/nginx/conf.d/sb_sewer-url.inc;
proxy_pass $myapp_backend;
proxy_http_version 1.1;
proxy_set_header Authorization "";
proxy_set_header Host $host;
proxy_set_header X-Real-IP $remote_addr;
proxy_set_header X-Forwarded-For $proxy_add_x_forwarded_for;
proxy_set_header X-Forwarded-Proto $scheme;
}
# ✅ API 요청은 백엔드로
location /api {
include /etc/nginx/conf.d/myapp-url.inc;
proxy_pass $myappr_backend;
proxy_http_version 1.1;
proxy_set_header Host $host;
proxy_set_header X-Real-IP $remote_addr;
proxy_set_header X-Forwarded-For $proxy_add_x_forwarded_for;
proxy_set_header X-Forwarded-Proto $scheme;
}
# ✅ 나머지는 모두 React SPA로 (index.html)
location / {
include /etc/nginx/conf.d/myapp_front-url.inc;
proxy_pass $myapp_front;
proxy_http_version 1.1;
proxy_set_header Host $host;
proxy_set_header X-Real-IP $remote_addr;
proxy_set_header X-Forwarded-For $proxy_add_x_forwarded_for;
proxy_set_header X-Forwarded-Proto $scheme;
# ✅ React SPA를 위한 설정
try_files $uri /index.html;
}
}
백엔드
vi myapp.confserver {
listen 8189;
server_name localhost;
location / {
include /etc/nginx/conf.d/myapp-url.inc;
proxy_pass $myapp_backend;
proxy_http_version 1.1;
proxy_set_header Host $host;
proxy_set_header X-Real-IP $remote_addr;
proxy_set_header X-Forwarded-For $proxy_add_x_forwarded_for;
proxy_set_header X-Forwarded-Proto $scheme;
}
}
심볼릭링크 생성
프론트
sudo ln -s /etc/nginx/sites-available/myapp_front.conf /etc/nginx/sites-enabled/myapp_front.conf백엔드
sudo ln -s /etc/nginx/sites-available/myapp.conf /etc/nginx/sites-enabled/myapp.conf
변경적용
sudo nginx -t && sudo systemctl reload nginx
이외의 것들은 아래 참고
https://jwinjection.tistory.com/293#5)%20nginx%20%EC%84%A4%EC%A0%95-1
CICD | Webhook을 이용한 Blue-Green 배포 구현
Webhook을 이용한 Blue-Green 배포 구현 시작하기전GitLab webhook과 Docker Registry가 필수로 구현되어 있어야합니다. https://jwinjection.tistory.com/286 Jenkins | GitLab webhook설정Jenkins | GitLab webhook설정최종브렌치인
jwinjection.tistory.com
'DevOps > 🛠️ CICD' 카테고리의 다른 글
| 리액트 빌드시간 최적화 (2) | 2025.05.26 |
|---|---|
| Python FastAPI + (Gunicorn || uvicorn) + Docker로 Blue-Green 무중단 배포 (0) | 2025.05.16 |
| CICD | Webhook을 이용한 Blue-Green 배포 구현 (2) | 2024.10.05 |
| Jenkins | GitLab webhook설정 (1) | 2024.10.01 |
| DuckDNS로 무료 도메인 등록하기 (0) | 2024.10.01 |
