| Thymleaf Fragement란?
웹페이지의 경우 공통으로 반복되는 영역이 많다.
페이지의 정보를 나타내는 헤더부분, 메뉴 탭을 나타는 네비게이션 바, 저작권 정보 등을 표시하는 푸터 등 여러 페이지에 거쳐 반복되는 영역이 존재한다
이런 공통의 영역들을 매 페이지의 HTML파일에 반복한다면 각 파일이 지저분해지는 것은 물론이고 변경의 지점 또한 분산되게된다.
공통의 영역을 분리함으로써 변경지점을 최소화할 수 있어서 변경에 용이하다
사용법
템플릿 조각을 이용하기 위해 footer.html 파일을 우선 만들어 준다.
<!DOCTYPE html>
<html xmlns:th="http://www.thymeleaf.org">
<body>

<footer th:fragment="copy">
    푸터 자리 입니다.
</footer>

<footer th:fragment="copyParam (param1, param2)">
    <p>파라미터 자리 입니다.</p>
    <p th:text="${param1}"></p>
    <p th:text="${param2}"></p>
</footer>

</body>
</html>해당 <footer> 태그들은 다른 HTML 파일에서 th:insert, th:replace 를 통해 사용할 수 있다.
th:insert="~{ [ 템플릿 조각 경로 ] :: 조각명}"
insert는 현재 태그를 유지하면서 템플릿 조각을 가져오는 방법
<div th:insert="~{fragment/footer :: copy}"></div>서버를 가동시켜 웹브라우저에서 HTML의 소스 코드를 보면 다음과 같다.
<div><footer>
    푸터 자리 입니다.
</footer></div>위 코드를 보면 <div> 태그를 유지하면서 템플릿 조각을 가져왔다.
th:replace="~{ [ 템플릿 조각 경로 ] :: 조각명}"
replace는 말 그대로 '대체'하는 방법이다. 현재 태그를 템플릿 조각에 있는 태그로 대체하는 방법
<div th:replace="~{fragment/footer :: copy}"></div>서버를 가동시켜 웹브라우저에서 HTML의 소스 코드를 보면 다음과 같다.
<footer>
    푸터 자리 입니다.
</footer>위 코드를 보면 <div> 태그가 사라진 것을 볼 수 있다.
th:replace="~{ [ 템플릿 조각 경로 ] :: 조각명 ('파라미터1', '파라미터2', ...)}
템플릿 조각은 파라미터를 전달하여 동적으로 렌더링을 할 수 있다.
<div th:replace="~{fragment/footer :: copyParam ('데이터1', '데이터2')}"></div>서버를 가동시켜 웹브라우저에서 HTML의 소스 코드를 보면 다음과 같다.
<footer>
    <p>파라미터 자리 입니다.</p>
    <p>데이터1</p>
    <p>데이터2</p>
</footer>실제사용예제
index.html
    <div class="content_box" >
        <div th:replace="${#lists.isEmpty(sheetList)} ? ~{defaultPage :: content_box} : ~{content::content_box}">
        </div>
</div>content.html
<div class="center_box" th:fragment="content_box">
    <div class="title_div">
        <input type="text" id = "openedSheetId" style="display: none;" th:value="${sheetId}">
        <div class="title">
            <span class="title_input" onfocusin="titleFoIn(event)" onfocusout="titleFoOut(event)"  id="title_input" role="textbox" contenteditable th:text="${sheetName}!=null ? ${sheetName}:null "></span>

            <button class="modify_btn" onclick="modifyBtn(event)" id='modify_btn'>
                <img src="/image/index/modify.png" alt="">
            </button>

        </div>
        <button class="plusbtn" id="plusbtn" onclick="openPlus(event)">
            <img class="plusimg" src="/image/index/plusimg.png" alt="">
        </button>
    </div>

    <div class="create_div" id="create_div">
        <table class="create_tb">
            <thead>
            <td>
                <div class="create_tb_title">
                    <p>등록</p>
                    <button id="cr_xbtn" onclick="closePlus(event)">x</button>
                </div>
            </td>
            </thead>
            <tbody>
            <td>
                <div class="create_content_div">
                    <p>일(day)과 내용을 입력해주세요</p>
                    <p><input id="date_info" type="text" placeholder="숫자만 입력가능합니다"></p>
                    <p><input id="content_info" type="text" placeholder="ex) 전기요금, 가스요금"></p>
                    <p><input id="submit_btn" type="submit" value="등록" th:onclick="|addPlan(${sheetId})|"></p>
                    <p id="tip">tip: 31일 이상도 입력가능합니다</p>
                </div>
            </td>
            </tbody>
        </table>
    </div>
    <ul class="main_content" id="maincontent">
        <li>
            <table class="main_content_table" th:each="board : ${boardList}" >
                <thead>
                <tr>
                    <td class="date_info" th:text="|${board.getKey()}일|">1 일
                        <hr>
                    </td>
                </tr>
                </thead>
                <tbody th:each="list : ${board.getValue()}">
                <tr class="content">
                    <td class="content_info">
                        <span th:text="${list.getValue()}">가스비</span>
                        <button class="content_info_xbox" th:onclick = "|delBoard(${list.getKey()},event)|" >X</button>
                    </td>
                </tr>
                </tbody>
            </table>
        </li>
    </ul>
</div>defaultPage.html
<div class="center_box" th:fragment="content_box">
    <div class= "default_box">
        <h3 class="default_h3"> 플래너를 자유롭게 활용해보세요!</h3>
        <p class="default_p">직관적인 인터페이스와 디자인을 통해 사용자가 쉽게 이해하고 활용할 수 있어 보다 체계적인 일상관리를 할 수 있습니다.</p>
        <p class="default_p"> 데이데이플래너를 통해 간편하게 일정을 기록하고 관리해보세요.  </p>
        <img class='exampleImg'src="/image/index/example.png" alt="">
        <div class = 'default_btn_div'>
            <button class ='startButton' onclick="deepCopy()" id='startPlanner'>
            시작하기
            </button>
        </div>
    </div>
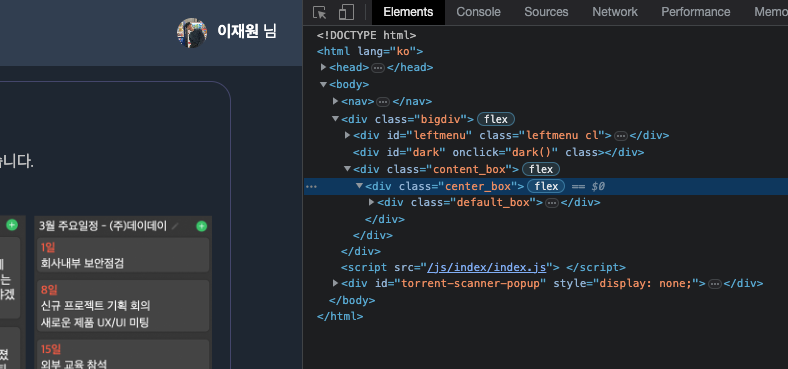
</div>아래사진을 보면
<div th:replace="${#lists.isEmpty(sheetList)} ? ~{defaultPage :: content_box} : ~{content::content_box}">
이 태그가 그대로 fragment와 replace되는것을 볼수있다.

'웹 개발 > 🍃 SpringBoot' 카테고리의 다른 글
| Spring MVC 동작 방식 (1) | 2023.06.15 |
|---|---|
| SpringBoot | 새로고침없이 페이지 부분변경하기(Ajax) (0) | 2023.05.26 |
| SpringBoot | 외부 경로 Resource 접근하기, 이미지 업로드 (0) | 2023.05.25 |
| SpringBoot | 카카오톡 간편로그인 구현 OAuth 2.0 (0) | 2023.05.24 |
| SpringBoot | 로그인,세션등록 (0) | 2023.05.24 |
